Learn how to create a product combination with one or more components including subscription components.
You can combine two or more products into one virtual product. A product combination is one or more sellable SKUs (components) combined as a single product that a shopper can purchase. It can consist of physical, digital, or subscription products and appears in a response as a single lineItem with the pricing details for that product combination.
If you are interested in using product combinations, contact your Customer Success Manager.
Considerations
Suppose you currently use Commerce API to sell product combinations and have been using the Return API for returning product combinations. In that case, you may be affected by the recent changes made in the product combinations.
You can use a subscription product as a component of a product combination (product combination) via Commerce API. Because the shopper views the product combination as a single product, the shopper will not see the real value of each component. It also leaves some space for you to play around with the pricing and positioning of the product.
Create a product combination with subscription components
Creating a product combination with subscription components allows you to bundle multiple items as a single product offering, enhancing the value for your customers. This process involves configuring the individual components and the subscription features to ensure a seamless purchasing and user experience. Follow the steps outlined below to create and manage your product combination successfully.
The following steps describe how to create a product combination:
Prerequisites
-
Step 1: Enable product combinations
-
Step 2: Determine how to cancel/return a product combination
-
Step 3: Configure site settings for subscription products
-
Step 4: Ensure component products are deployed
-
Step 5: Create a product combination with components
Prerequisites
Certain information and settings must be prepared before creating a product combination with components. Below is a list of prerequisites needed to ensure a smooth setup process.
-
Gather the following information before you create the product:
-
Text (TXT) file containing the list of serial numbers or unlock code. The file must contain one code per line (with a hard return between codes).
- Application file (if the product is downloadable)
- Product images (thumbnail and full image pictures)
- Product descriptions (short and long)
- Export Control Classification Number (ECCN) and Country of Origin
-
- Enable product combinations before you create a product combination (with components). For more information, see How to enable product combinations.
Step 1: Enable product combinations
Before you create a product combination (with components), you must enable product combinations at the company level. See How to enable product combinations for more information.
Step 2: Determine how to cancel/return a product combination
See How to enable the cancellation/return of a product combination for instructions.
Step 3: Configure the site settings for subscription products
Setting up site configurations for subscription products in Global Commerce is essential for properly managing and delivering your subscription-based offerings. This process ensures that your subscription products are correctly integrated and aligned with your overall site settings, providing a seamless shopping experience for your customers. Follow the steps below to configure the necessary settings efficiently. If you don't have subscription products, you can skip this step. If you are going to create subscription products, this step is required.
Required Role: Content Manager or Digital River Internal User
-
Follow the instructions inHow to configure site settings for subscription products to configure the subscription settings.
-
If your product combination contains one or more subscription products, ensure a product combination meets the following conditions so the system can combine the notifications, billing, and shipping for those subscriptions.
-
Set up at least one subscription in the product combination to allow product combinations.
-
All subscription must belong to the same shopper and use the same payment method. Note that Global Commerce does not currently support physical subscription products.
-
You can only combine subscriptions purchased from the same site. You cannot combine subscriptions from different sites owned by the same company.
-
The expiration date must be the same for all subscriptions.
-
The billing and shipping information must be the same for the subscriptions.
-
You must enable the User Autorenew Subscription Combined Renewal notification for the site even if you do not enable combined subscriptions for the product.
-
You must enable the products to be combined and specify the expiration dates within a set number of days on the product setup.
-
A shopper can visit www.findmyorder.com or call Customer Service and choose to combine one or more subscriptions before their expiration date. Complete the search fields and click Search
 .
.
-
Step 4: Ensure the component products are created and deployed
Creating and deploying component products is essential to ensure that all parts of your product are available and functional. This step involves making sure each individual component—whether digital, physical, or subscription-based—is properly configured and published. Refer to the Creating an individual product and Deploy Products guides for detailed instructions.
Step 5: Create a product combination with components
Creating a product combination with components allows you to bundle various product types—digital, physical, and subscription items—into a single offering. This method simplifies management and enhances the customer experience by providing a unified purchase option. Follow the steps below to create an effective product combination in Global Commerce.
-
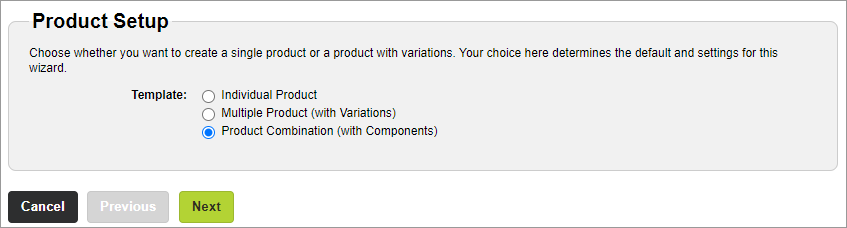
Go to the Product Setup wizard and choose a template.
-
Choose one of the following options:
- Select Catalog, select Products, and then click Create Product.
- Select Catalog, select Products, click Manage Product and then click Create Product.
-
Choose the Product Combinations (with Components) template. See Product Setup for more information.
-
Click Next.
-
Select the supported locales. See Supported Locales for more information.
-
Select the checkbox next to each locale you plan to support.

-
Select the Default option next to a locale that you want to use as the default.
The system will use the default locale to display in your store if the shopper’s locale is unknown.
-
If required, select the Restrict Product Visibility and Purchasing to Locales Below checkbox.
Note: When you select this checkbox, you are only selling this product to the selected locales. For product combinations, the supported locales must include the supported locales for the components that have product visibility and purchasing restrictions. Likewise, the supported locales in the components must include the supported locales for the product combination if there are product visibility and purchasing restrictions in the product combination.
- Click Next.
-
-
Add the product to catalogs and categories. See Catalogs and Categories for more information.
-
Under Add Product to Catalogs, select the checkbox next to each catalog where you want the product to appear.
Requirement: The catalog associations must include all its product combination components. For example, if you associate a product combination with catalogs A and B, you must associate all of the components in the product combination with both catalogs.
-
Under Add Product to Categories, select the checkbox next to each category where you want your product to appear.
Note: You must select a catalog before you can select a category.

- Click Next.
-
-
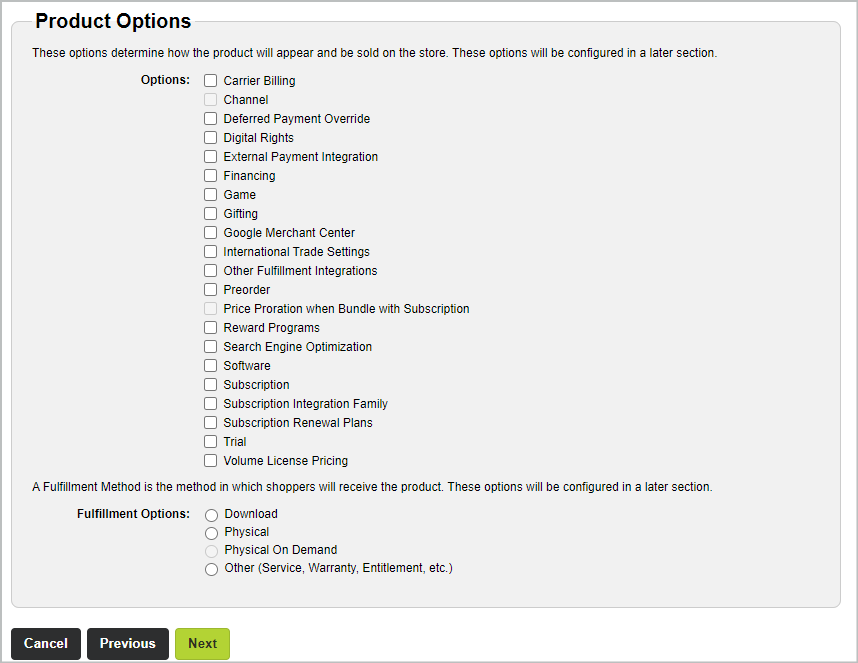
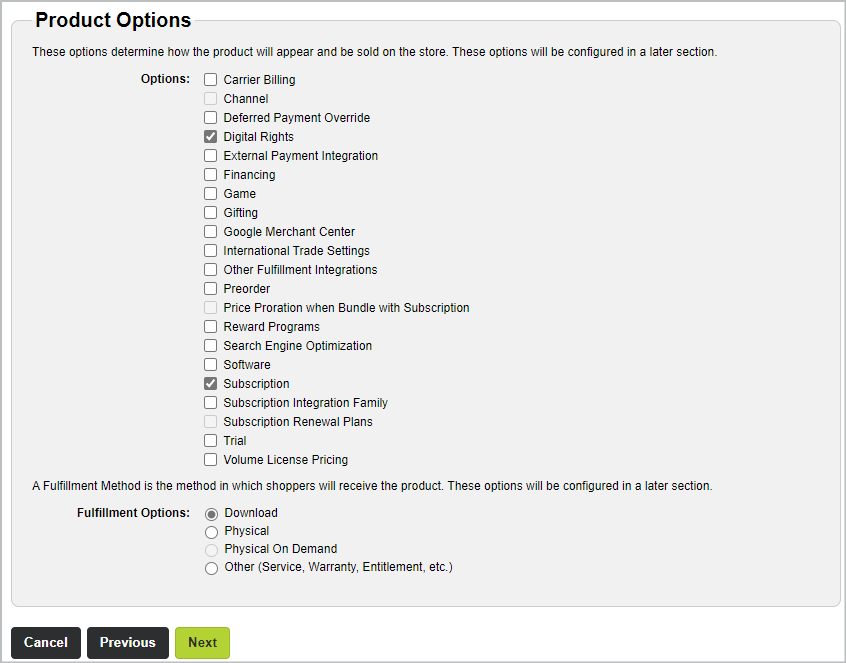
Select the product options. See Product Options for more information.
-
If your company created Custom attribute families, select the checkbox next to each option you want to apply to the product. If you a creating a subscription product, select the Subscription option.
Note: If you are creating a subscription product, select the Subscription option.
For additional information on creating subscription products, see How to create a Flex Term renewal for a subscription product
-
Select the fulfillment option for your product and click Next.
Note: You can select multiple fulfillment options if you create a product with variations. (Checkboxes instead of option buttons appear next to each fulfillment type.) If you select multiple fulfillment options, you must create a product variation for each.
-
-
Configure the product settings. See Product Settings for more information.
- To change the product settings for the default locale, click the default locale tab and complete the fields. If you click a different locale tab, click Yes when prompted to save your changes.
- Click the tab for a locale, select the Override default local settings checkbox, and complete the fields. If you click a different locale tab, click Yes when prompted to save your changes. Repeat this step for each additional locale.

- Click Next.
-
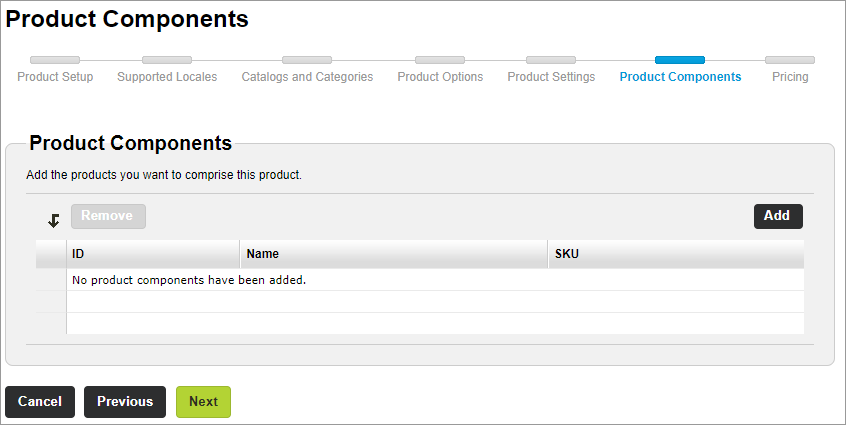
Configure the components for a product combination. See Product Combination for more information.
The system combines the billing for all the components into one order. However, the notifications for "shipping (physical)" and "subscription" will be sent on a line item level basis. When a line item is shipped, the system sends a notification to inform the shopper, and these notifications won't wait for the entire order to be shipped. Additionally, every single subscription is on a line item basis, and the subscription notifications are all sent on a line item level, just as they are now.
-
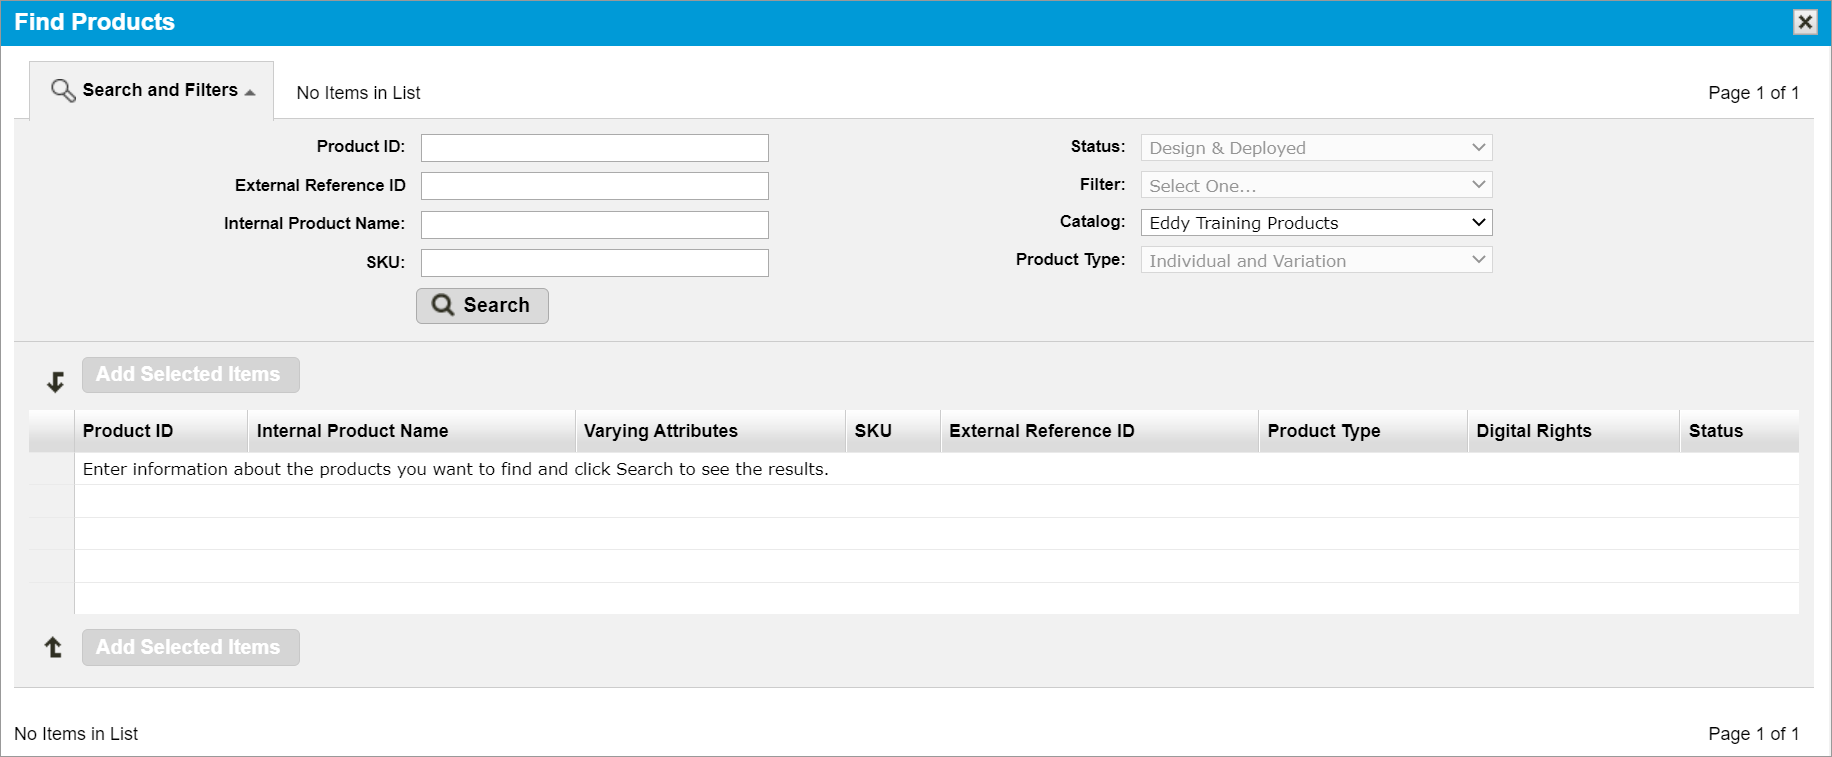
Click Add.
-
Complete the search fields and click Search
. -
Choose one of the following options:
- To select one or more products, select the checkbox next to each Product ID you want and then click Add Selected Items. Add at least one subscription to the product combination. You can include physical and digital subscription products. You can only combine subscriptions purchased from the same site. You cannot combine subscriptions from different sites owned by the same company.
- To select all products in the list, select the checkbox next to Product ID, and then click Add Selected Items.
The products appear in the Product Components list.
- Click Next.
-
-
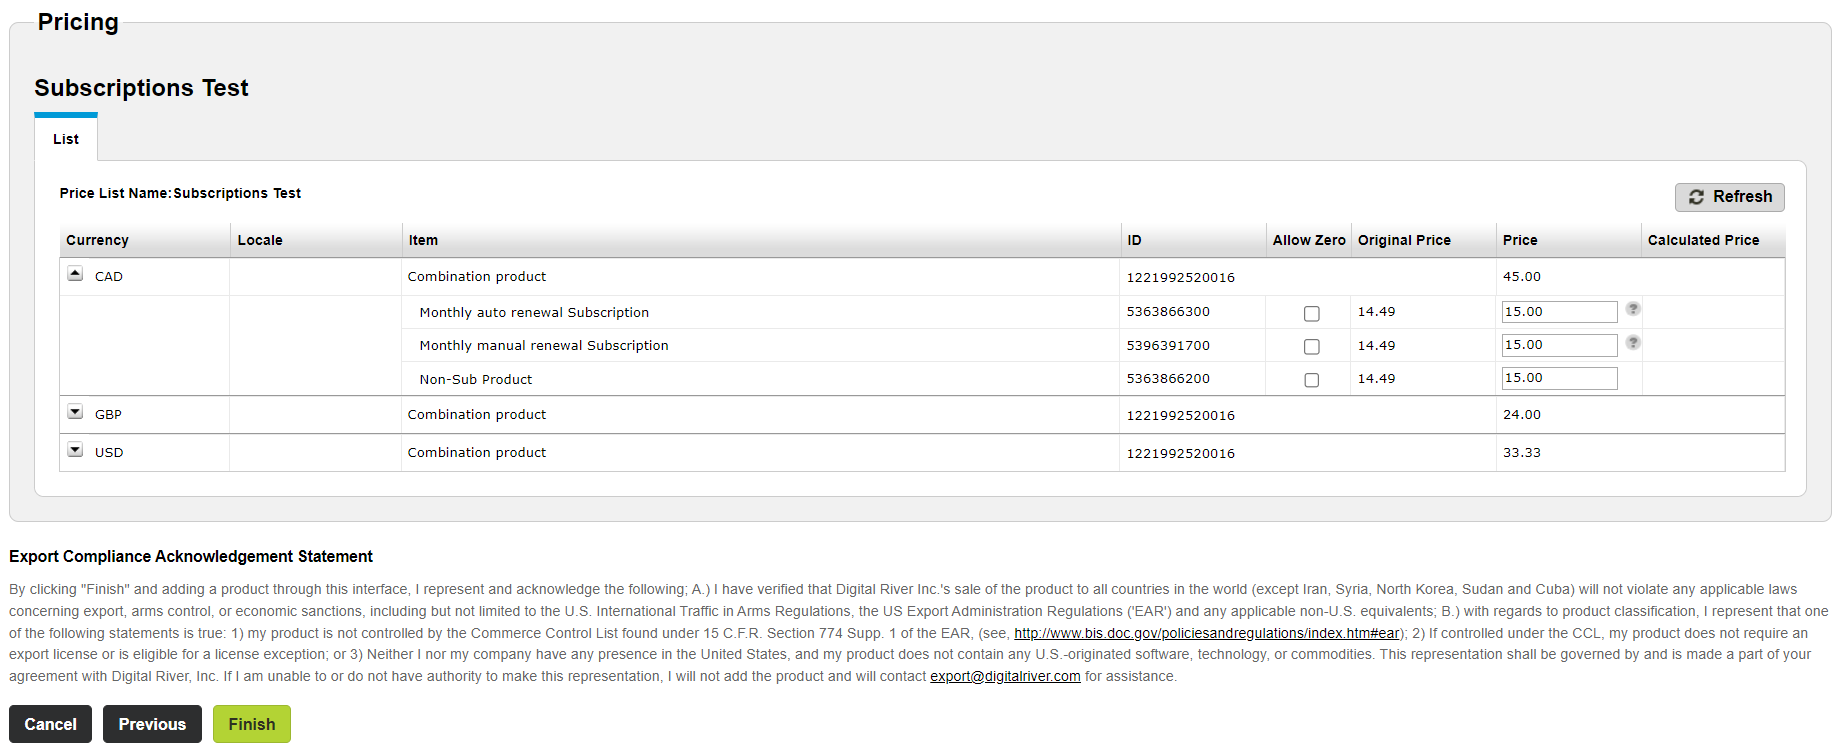
Assign a price to the product. If you don't assign a price on the Pricing step when creating a product combination with components, the system will use the original component's product price. See Pricing for more information. See Pricing for more information.
-
To display the components associated with the product combination, click the Expand button next to the currency.
- For each component in the Pricing list, perform the following steps:
Type the price of the each component in the Price fields.
(Optional.) If the product is part of a promotion or giveaway, select the Allow Zero checkbox.
Click Refresh to calculate the price of the product combination.
-
Repeat steps a and b for each additional currency.
-
Click Finish. The Edit Product page appears.
Important: You acknowledge the Export Compliance Acknowledgment Statement by clicking "Finish" and adding a product combination through this interface. This statement appears at the bottom of the Pricing step.
Note: If the Edit Product page shows any errors, you can correct the errors on the Edit Product page and save the changes.
-
-
Deploy the combination product. See Deploy Products for instructions.
How to create a Flex Term renewal for a subscription product
To create a subscription that uses Flex Term renewal:
- Follow the instructions in Creating a product combination.
-
When you reach the Product Options step, select the Subscription checkbox.
-
When you reach the Product Settings step, complete the fields under Subscription. See Subscription for more information.

- Choose Flexible Term from the Payment Schedule drop-down list.
- Select the number of billing cycles from the Number of Billing Cycles drop-down list.
- Under Reminder Emails, clear the checkboxes associated with Reminders for Automatic Renewals.
- Choose one or more manual renewal reminder checkboxes associated with Reminder for Manual Renewals.
- Select one or more checkboxes associated with Update Expired Credit Card to send credit card expiration reminders before billing events.
- Click Next and complete the rest of the fields in the Product Setup wizard.
Flex Term renewal scenarios
In this section, we will explore different scenarios to illustrate how subscription renewal settings impact the overall pricing strategy for products with flexible terms. Understanding these scenarios will help you manage and anticipate the pricing behaviors of various subscription models, ensuring a seamless experience for you and your customers.
Scenario 1
This scenario explains how price settings affect subscription renewals for a product combination. Initially, the user sets the price model to the Component Price (e.g., $20). After the subscription is created and renewed at this price, the subscription's perpetual price is set at $20. Changing the pricing setting later to use Price List Price (e.g., $50) does not affect the already established perpetual price. Therefore, despite the change in settings, the subscription renewal price remains at the originally set perpetual price of $20.
The steps outline the process as follows:
-
User set to use Component Price (e.g., $20)
-
subscription created
-
subscription renewed (e.g., $20)
-
The user changed the setting to using Price List Price (e.g., $50)
Scenario 2
This scenario highlights the impact of switching pricing models on the subscription's renewal price for a product combination. Initially, the user opts for the Price List Price model, setting the price at $50. Creating and renewing the subscription at this price solidifies the subscription's perpetual price to $50. Even if the user later changes the pricing model to Component Price, reducing the theoretical price to $20, the established perpetual renewal price remains unaffected at $50.
The steps outline the process as follows:
-
The user opts for the Price List Price setting ($50).
-
A subscription is created following this pricing model.
-
The subscription is renewed at $50, cementing this as the perpetual price.
-
Despite the user changing the pricing model to a Component Price ($20), the subscription renewal price adheres to the previously established perpetual price of $50.
This scenario demonstrates that once a perpetual price is established through a subscription's renewal, subsequent changes to the pricing model do not alter the renewal price.
Scenario 3
This scenario elaborates on the process and implications of updating a subscription's renewal price for a product combination through a perpetual pricing mechanism.
The subscription's perpetual price is initially established at $50. Regardless of subsequent amendments to the subscription's pricing model, the renewal price remains constant at the initially set perpetual price of $50.
The steps outline the process as follows:
-
Subscription Creation: The shopper subscribes to a service and initializes their subscription.
-
Perpetual Price Update: The user executes an update via the POST /v1/subscriptions/{subId}/perpetual-price request, modifying the subscription's price.
Despite the Global Commerce mechanism's configuration to adopt the Price List Price for renewals, the system prioritizes the perpetual price set in step 2 for the next renewal cycle. Therefore, even if you toggle the Global Commerce to reflect changes in the Price List Price, the perpetual price updated in Step 2 will override this for renewal billing.
This enhancement ensures a consistent renewal price for the user, regardless of changes in the subscription's pricing model after establishing a perpetual price.