Use the Products options to create and manage your products, as well as items related to your products.
A product is an item that you can sell in your store. A product could be a physical object like a digital camera, a subscription to anti-virus software, or access to an online forum or website.
The system organizes the products by category within one or more catalogs created for your store. To learn more about catalogs and categories, see Catalogs and categories.
Inline validation
Global Commerce validates the settings on a page when you click the Save button, move to the next step of a wizard, or refresh a page. The validation reviews every field, option, and setting to ensure that you set it up correctly.
Inline validation is not exclusive to products. Other features such as Marketing and Store Builder use inline validation to help you set up items correctly for those features.
If the system finds problems during page validation, an error message appears in two places on the page.
-
The first message appears at the top of the page and provides a summary of each error on the Managing partners page. You can click an error to jump to the field or area associated with the error.

-
The second messages appear above the field or option where the error occurred. This message identifies the field you need to fix.

Product versioning
The product version indicates the current configuration (setup) of the product. You can see the product version when editing a product. See How to edit a product for more information.
The product's version number changes each time you save changes to the product settings. These changes can include pricing, product options like Subscription or Software settings, locales, Storefront Settings, and so on. Changing some settings does not create a new version of the product.
Best Practices: Assume any change to a product will change the product version.
You can create a link that adds a product to the shopping cart or sends the shopper to a specific product page. When you create the link, you must make sure that link points to the currently deployed product version in your store. When you created the link for a previous version, it may not behave as you expect and may cause problems when a shopper places an order for the product or tries to use the link. That means when you change a product and deploy those changes, you must update the links you created to ensure the link points to the latest version.
How to view a product's version
To preview a product's version:
- Select Catalog, select Products, and click Manage Products. The Products page appears.
- Complete the search fields and then click Search
 to find the product.
 -
Click the internal product name for the product under the Internal Product Name field. The Edit Product page appears.
The product version appears in the Version field.
Product attribute families
A product attribute family is a set of related attributes that describe a product. Use a product attribute family to define product characteristics such as size, color, version, platform, and so on. When you create a product, choose the settings you want the product to assume.
Note: The information provided here is for educational reference only. You do not need a thorough understanding of product attribute families to create and manage your products in Global Commerce.
There are two product attribute families you can use to define products in Digital River stores: custom attribute families and common attribute families.
Custom attribute families
The Store Operations team creates a custom attribute family specifically for your store and products when they create your store. To learn more about your custom attribute families or request a new custom attribute family, contact your Store Operations team.
Common attribute families
Common attribute families contain settings and attributes that are available to all stores hosted by Digital River. You can use the common attribute families to define products for your store. For more information on these families, see Product Options.
Custom and common product attributes
An attribute is a characteristic of a product. Product attributes are a group of related attributes that define products and product variations. You define attributes when you create or modify a product and its variations.
There are two types of product attributes:
- Custom product attributes are the company or site-specific attributes. Digital River creates custom product attributes for a client on request. These attributes are only available to the client that requested the custom attributes.
-
Common product attributes are available to all Digital River clients. Digital River creates and manages these attributes. You cannot change these attributes. However, you can view the common product attributes and individual attributes.
Prerequisite: You need the Family Manager role to work with product attributes.
How gifting works
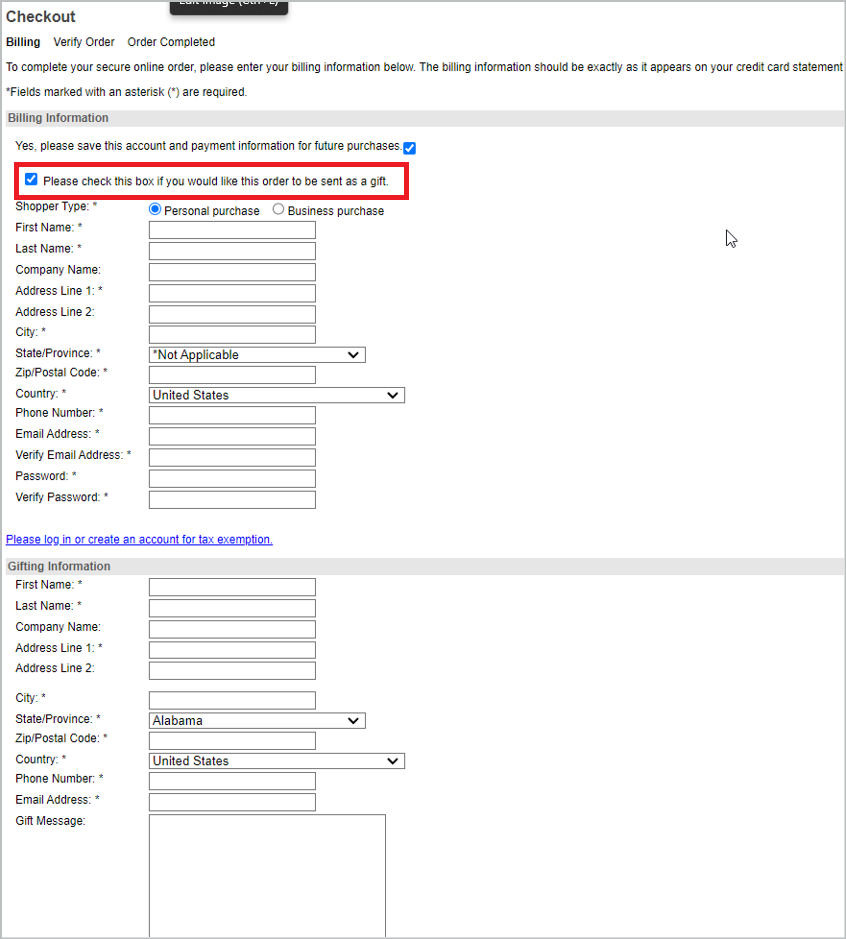
Gifting allows customers to buy products as gifts for others. This feature restricts gift orders to one recipient per order, requiring the shopper to select the gift checkbox that appears during checkout and enter recipient details such as name, address, and email address during checkout. The purchaser can also enter a personal message.
Prerequisite: To enable gifting for physical and digital products, activate Gift Messaging in Global Commerce. After enabling, select the Gift checkbox in Product Options when creating or editing an individual product.
The following instructions explain how mark a product as a gift and send it to a recipient from a Global Commerce-hosted Checkout page.
Digital gift
Digital gifts offer a convenient and modern way to give a present to friends and family. By purchasing a digital product as a gift, the shopper can quickly send it via email, making it an excellent option for last-minute presents or sending to recipients in different locations. The process involves selecting the gift option, providing the recipient's details, and optionally including a personal message. The recipient will receive an email notification containing the gift and redemption instructions, ensuring a seamless and delightful experience.
When a shopper purchases a digital gift, they must:
A shopper can purchase a digital product as a gift for others. When a shopper purchases a digital gift, they must:
-
Select the Send as a gift checkbox to replace the shipping block with the gift information.
-
Enter the recipient's first and last name and email address.
-
The shopper can also choose to enter a personal message. The recipient will receive an email notification with redemption details, excluding pricing information.
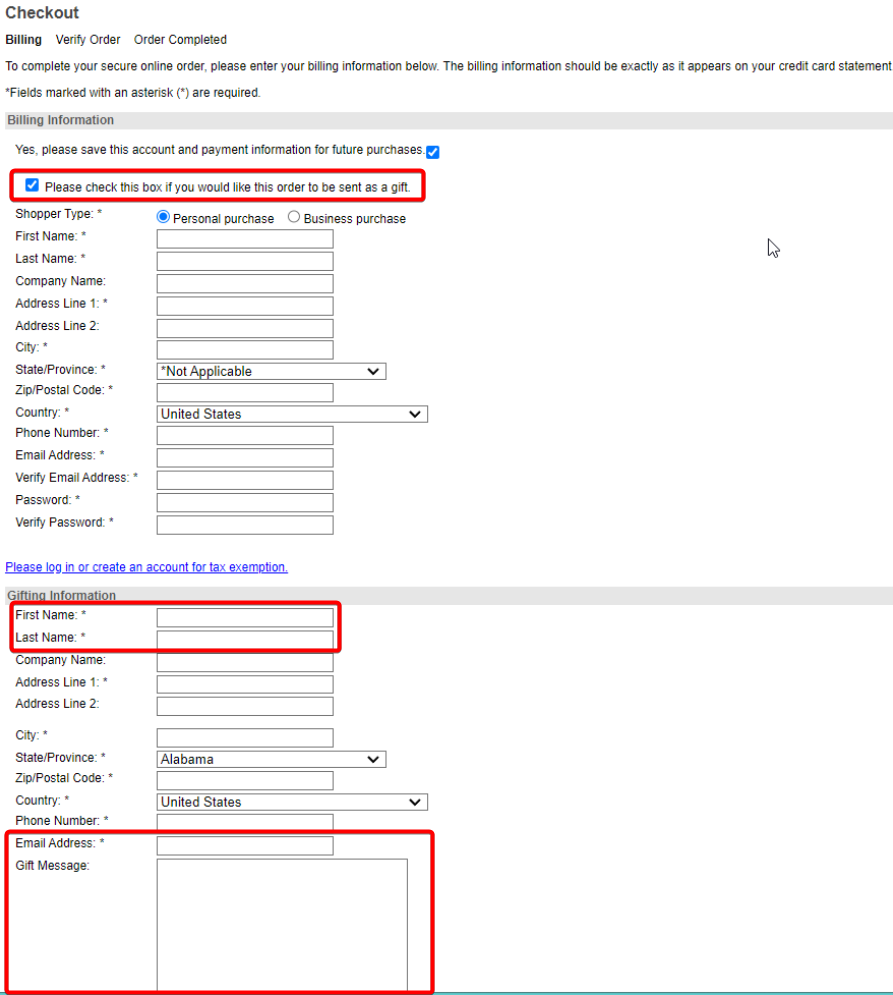
When the shopper submits the order, they will see their billing information, payment method, order information, and the gift recipient's information.
When creating the checkout page for a digital product, it is recommended to include an optional prompt for the customer to specify if the digital product will be used in a different location (country and city). This will help the tax engine to accurately calculate the tax.
Both purchaser and recipient receive email notifications. The purchaser will receive an email stating that an email with redemption details has been sent to the recipient.
The recipient will receive an email notification with redemption details, possibly including a personal message and excluding pricing information.
Physical or mixed gift
When purchasing gifts, it's important to differentiate between digital and physical items. Physical gifts include any tangible product bought with the intention of gifting. Mixed gifts involve a combination of physical items and digital elements. Providing accurate shipping information for physical and mixed gifts is crucial to facilitating proper delivery and tax calculation. This section outlines the necessary steps and considerations for handling these types of gifts within Global Commerce.
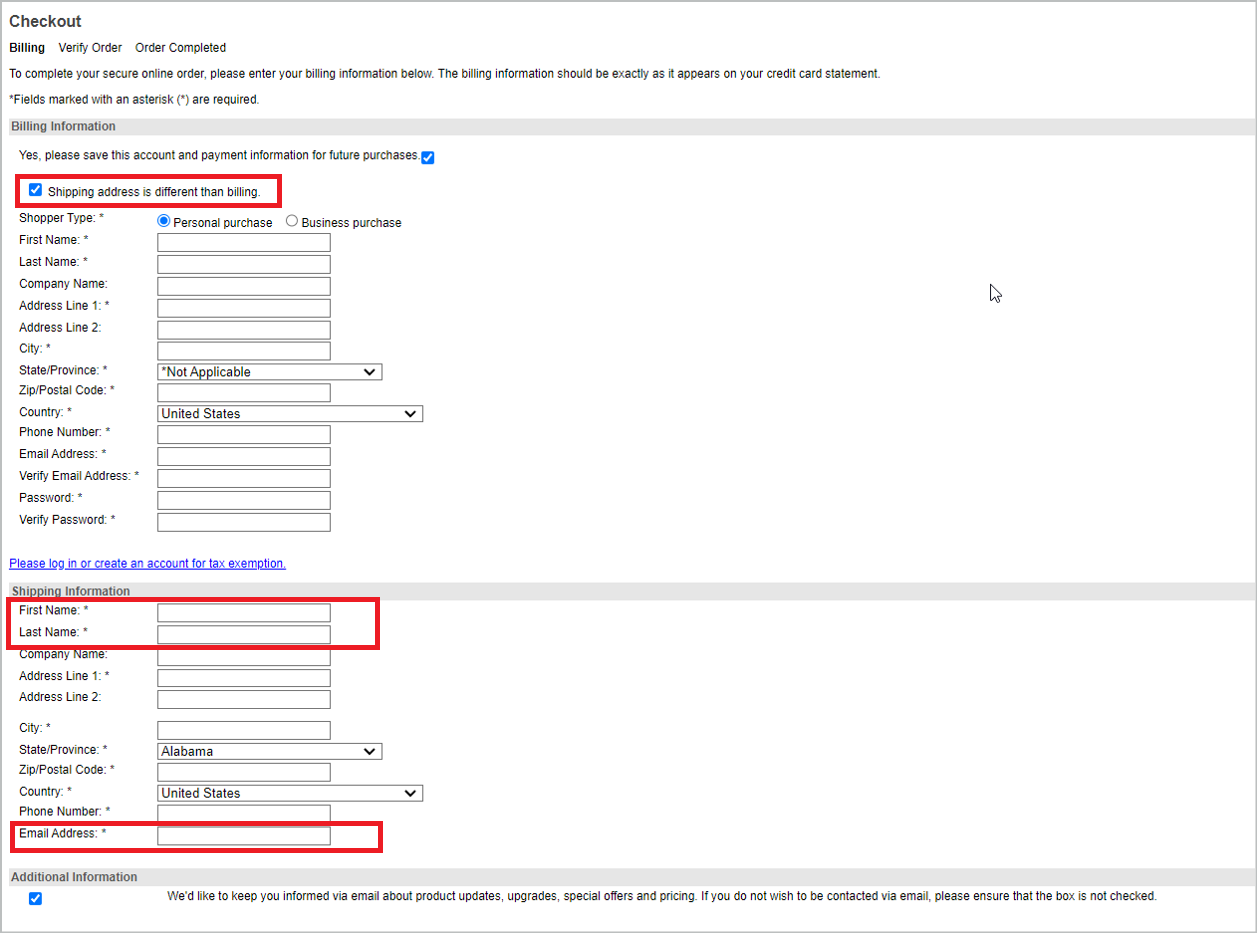
Physical gifts are tangible items purchased as presents for others. When a shopper buys a physical gift, they must:
-
Select the Shipping address is different than billing checkbox to display the shipping block. Enter the recipient's first and last name, email address, and shipping address to ensure proper delivery. Commerce API uses this address for shipping and tax purposes.
-
Clear the Shipping address is different than billing checkbox.
-
Select the Send as a gift checkbox to replace the shipping block with the gift information. The shopper can also choose to enter a personal message. The recipient will receive an email notification with redemption details, excluding pricing information.
Refunds and returns
Gift recipients or purchasers can request a refund or return for any product in an order marked as a gift, similar to any other product in the store. When the recipient or the purchaser initiates a refund or return, the system will send an appropriate email detailing any necessary actions to complete the process to either the recipient or the purchaser.
How the product lifecycle works
You manually deploy a product when you want it to appear for sale in your store. You can later retire the product when you no longer want it to appear in your store. The Product Lifecycle settings allow you to define when products automatically appear for sale and then disappear from your store.
Start and end date
Use the start and end dates to control when the product is available in your store. If you set a start date, the product will automatically appear in your store on the specified date. Assuming you selected the a value for the Options attribute and then deployed the product. If you set an end date, the system will automatically hide the product on the selected end date.
Note: When you set a start date in the lifecycle settings, you must deploy the product before or on the start date. Shoppers will not see undeployed products that reach their start date.
How your time zone preference affects the start and end date
The system uses the User Time Zone associated with your user account preference for the start date and end date. See Managing my information for more information on setting your time zone preference.
Example: Assume you selected CST/CDT time as your preferred time zone in Global Commerce. If you set up a product to start at July 19th at 10:00 AM PST/PDT, the system converts the time to 12:00 PM on July 19th when you click Save because that is the same as 10:00 AM PST/PDT.
How the product status changes with lifecycle
As the product moves through its lifecycle, the status changes to reflect its state. The following table describes the statuses specific to a product using the Product Lifecycle settings. See Product status for more information.
| Status | Definition |
|---|---|
| Deployed: Expired |
Indicates a product with variations has different start dates or end dates for the variations or locales. All dates for the product variations or locales have ended. This status only appears when you use the Product Lifecycle setting. |
End of life notifications
When a product reaches its end date, you can receive up to three emails. These emails notify you when the product reaches the end of its lifecycle. You can choose to send the notification months, weeks, or days prior to retirement.
Product lifecycle and products with variations
When you configured a product with variations to use the Product Lifecycle setting, you can set a different start and end date for each variation in each locale. When you set a different start date or end date for a variation, a message appears when you view the product that reminds you when your base product and variations will start and end.
The following list outlines how lifecycle settings affect products with variations:
- Variations automatically inherit lifecycle settings of their base product until you override the base product settings and set a specific start date and end date for the variations.
- The start date and time for the variations cannot occur before the base product start date and time.
- The end date and time for the variations cannot occur after the base product start date and time.
- The base product end date cannot occur after the last end date for any of the variations of the base product. If you set the base product end date to occur after the last end date for one or more variations, the system will automatically update the end date of the base product to the last end date of the variations.
Product lifecycle and subscription products
If you use the Product Lifecycle settings with your subscription products and set a specific end date, the subscription product must include a Transfer Product. This ensures that when you retire a subscription, customers will still receive their subscription when it renews. Once you set an end date for a subscription product, you cannot remove the subscription transfer product.
Product lifecycle and preorder or preload products
The following rules dictate how the Product Lifecycle settings work with a Preorder product.
- The start date must occur before the preorder and preload dates.
- The end date must occur after the preorder or preload dates.
How Global Commerce calculates taxes for your store
When a shopper purchases a product in your store, the system automatically calculates the taxes based on a variety of factors. This includes the tax group and tax type, as well as the ship-from address (product source), ship-to address (product destination), and product weight.
We use a highly respected and powerful system to calculate tax on orders. By creating tax groups and tax types for you to classify your product, we made it easier for our tax system to accurately calculate tax no matter what the product is or where in the world the shopper placed the order.
Tip: You can view a list of all available Tax Groups and Tax Types (including the SABRIX™ code used by each) by clicking View Tax Settings.
Setting the default Tax Group and Tax Type
You can set up the default group and type using the Product Template. See Product Setup for more information. If you need a tax group or type that is not in the list, contact your Store Operations team.
Product images
Images are an important visual element for your products because shoppers see these images when they"
- Browse your store for products
- See a product listed on a Category Listing page, Product Details page, or within an offer.
The type of images you can add to your product are as follows:
- Product Images—Appears on the Product Details page and may appear in other areas if your store has been customized to show additional images.
- Thumbnail Images—Appears next to the product in areas of your store where the product appears among a group or list of other products, such as with search results or an offer that shows "top" or "featured" products.
Image types and sizes
Use high-quality images that represent the products to your shoppers. Most product images are just pictures of the product itself, but you can also use other images such as the product logo, your company logo, and so on.
You can use any one of the following image types for your product images:
- GIF (Graphics Interchange Format)
- JPG or JPEG (Joint Photographic Experts Group)
- PNG (Portable Network Graphics)
- BMP (Bitmap)
- TIF or TIFF (Tagged Image File Format)
- EPS (Encapsulated PostScript)
- ICO (Icon)
The exact size of the image you use for the thumbnail and product image may vary by the unique set up of your store. However, most thumbnail images are 100px × 100px and product images are 250px × 250px.
Tip: When you save images for use with products, use words like "standard" and "thumbnail" in the file name to help you easily identify the images after you upload them to Global Commerce. The system saves uploaded product images in a central location, so it can be difficult to identify or locate a specific image. To save time when working with your products, organize or name your images in a meaningful way.
How Physical on Demand (POD) works
Using the POD fulfillment option is similar to other fulfillment options, except you must set up the product before you deploy it to your store. The product setup defines the files copied to the physical discs and the artwork that appears on the disc and disc case.
A POD product does not look that different from traditional physical software, game, or digital product in your store. "Physical on Demand" appears as a delivery option when the shopper views the product, but everything else on the product and store looks and operates as it normally would. This means you can use the POD option without affecting or interfering with the shopping experience.
When a shopper places an order for a POD product, that order goes to one of our POD fulfillment centers in either Germany or the United States, depending on the shipping address for the order. Depending on how you set up the POD, the physical product can be ready for shipment in as little as a day.
Disc type and shipping costs
When you set up a POD product using CMPS as the POD fulfiller, you can also select the disc type the product will use. The disc type determines the size of the disc and the disc case.
Note: You can only select the disc type for POD products fulfilled by CMPS.
Each disc type has an associated weight, and that weight determines how to calculate the shipping costs and charge for the POD product. The following list shows the available disc types and the weight associated with each disc type.
- Cardboard mailer: 3 oz.
- Slim DVD: 5 oz.
- Standard DVD: 5 oz.
- Double DVD: 6 oz.
POD benefits
The Physical on Demand option allows you to offer a physical version of your digital products without having to maintain a physical inventory. There are several other reasons why you might want to offer the Physical on Demand option for your digital products:
- Eliminates inventory investment and hassle
- Reporting integrated with Global Commerce
- Payments included in monthly billing
- A fast and easy product set up
- Increases your distribution of physical goods
-
Gives shoppers the option of purchasing a physical title in markets currently not available
- Provides shoppers who are unfamiliar or uncomfortable with download products a sense of familiarity and security
Disc and packaging requirements
The files used for your Physical on Demand (POD) disc contents, disc label, and disc case image must meet the specific requirements, as outlined in this topic.
Disc label image specifications
The following list describes the requirements for the disc label image:
- The image must be a JPEG (.jpg) file.
-
The image must be 300 DPI resolution format. Larger images will not fit on the CD properly.
- The image should measure no more than 4.75 inches. When printed, it will appear on the top half of the CD. The bottom half shows shipping and Digital River-related information. If you need more space on your disc, contact your Store Operations team.
Disc case image specifications
Digital River prints disc case image and inserts it in the DVD case that holds the disc. All POD products include basic disc inserts. You can review binding, stapling, or other unique printing requirements on a case-by-case basis. The list describes the requirements for the disc case image:
- The file must be a PDF (.pdf) file.
- The size of the artwork should be 7.25 x 10.75 inches.
- The file must include crop marks.
-
The file must include a least 1/4 inch bleed. The bleed area does not appear on the printed image. It ensures that your design extends to the edge of the cover.
-
The text in the file must not appear closer than 1/4 inches from the edge. This ensures that the final printed cover will not cut off the text.
Disc content files specifications
When creating a physical disc, Digital River burns the Disc content files on the physical disc. Products that require multiple discs require prior approval by Digital River. Contact your Store Operations team if your product requires a multi-disc format.
- The total size of the files cannot exceed the size of a normal CD (700 MB) unless Digital River gives prior approval.
- For software programs and other files that customers need to install, we recommend that you wrap the files with an installer or similar mechanism to help customers install the program.
How to create a POD product
- Create a new product or edit an existing product so that it uses the Physical on Demand (POD) fulfillment method.
- After you enable the POD option, configure the POD option. You need to select the images for the CD or DVD label and case artwork. You also need to include all of the product files (executables, binaries, and so on) that you want to burn onto the physical disc.
- After you set up the POD option, set up the rest of the product settings as you would with any other product.
-
When you finish setting up the POD options (disc contents and packaging), submit the product setup to Digital River for testing and approval.
When you submit a POD product for approval, the system locks the POD setup. You cannot change or deploy it until the Digital River completes the test and gives approval.
During the approval process, Digital River verifies that they can use the files and images to create a physical disc. The process usually takes three days to complete. Digital River will send you an email when they approve the product.
-
After Digital River approves your product, you must provide the final approval for the product and then deploy the product to your store where shoppers can purchase it.
If needed, you can reject the setup, make changes to the disc contents and packaging, and submit the product again for approval.
How to approve and complete a POD layout (disc and contents)
After you create a POD product and submit it for approval, Digital River will send you an email when they approve the product. You can deploy the product and sell it on your site when you receive approval. If Digital River sends an email requesting specific changes, you need to make the changes to the POD setup and submit the product for approval again.
The following image shows the POD approval process.

- After you receive the product approval email, sign in to Global Commerce.
- Select Catalog, select Products, and then click Manage Products. The Products page appears.
- Click the name of the POD product (or the POD variation) in the Products list. The Edit Product or Edit Variation page appears (depending on whether the POD product is an individual product or product variation).
- Scroll down to the Physical on Demand Details area and click Configure Contents and Packaging. The Configure Disc Contents & Packaging window appears. Most of the window will appear blank because the POD product files are locked and awaiting your approval. You can click the links in the window to view the disc label or disc packaging files you previously uploaded.
-
To approve the product, click Approve. The system locks the disc content and packaging files, and you can deploy the product. See Deploy Products for instructions on deploying your POD product.
Note: If you change the disc contents and packaging files, you have to go through the approval process again.
To reject the product, click Reject. If you reject the product, the files are unlocked. You can make changes to the file and request approval again.
How to place a test order for a POD product
Once you get final approval for your POD product layout, you may want to make the product "invisible" and place a test order before you deploy the product. This allows you to see the final POD product result before showing the product to your shoppers. See Test orders for more information on placing test orders.
The best way to test your POD product is to make it "invisible" in your store.
- Edit the product from the Edit Product page and clear the Display Product checkbox. See Products for more information.
- Deploy the product.
-
Place a test order for the POD product.
Requirement: You need the PID to enter in the URL to load the product details page in your store.
Note: Shoppers won’t be able to find the product through the category list or search result pages.
- Once you receive your POD test product in the mail (usually in a few days), edit the product from the Edit Product page, select the Display Product checkbox, and then deploy the product again so that the product appears in your store.
Preorder options
A preorder allows shoppers to purchase a product before the product is released or available for general sale on your store. Preorders allow you to build excitement for your product before you release the product to the market. You can create preorders for products like movies, music, games, and other products with a definite release date.
Allowing shoppers to preload a preorder product
You can set up a preorder product so that shoppers can preload (download) the product before it is released.
Example: You want to allow your customers to download a large software product that they purchased as soon as you release the product.
When you enable preload for a preorder product, shoppers will receive a notification that contains a link to begin the preload for the product when the preload period begins.
Important: To use the preload option for preorders, you must set up your store to support preloads. Contact your Store Operations team for more information.
Receiving notification of preorders
How you manage the pre-release of a product is important to the success of the product launch. You can set up your preorder product so that you get a report of the orders placed for the product. To do this, enter your email address in the Audit Email Recipient field and define how many days before the preorder release date you want to get the report in the Audit Number of Days field.
Setting the release date
You set the release date for a preorder product by date, time, and time zone. When the release date occurs, preorders for the product will stop, fulfillment for all preorders will begin, and customers can purchase the product on your store.
Note: By default, the system uses your time zone preference (as set on the Managing my information page) when you set the release date. However, you can change the time zone as need.
Editing the release date
Once you deploy a preorder product, you should be careful making any changes to the preorder details, especially the release date. You can change the release date after you deploy a preorder product if needed and then redeploy the product for those changes to take effect on your store.
Note: You can send an email notification to shoppers who purchased the preorder product when the release date changes. To learn more how to set up email notifications for your store, contact your Store Operations team.
Game ratings and reasons
We encourage you to use game rating systems and assign ratings to any game products you sell on your store. Most rating systems have standards that define how and when you should use that system's rating. Failure to comply with these standards can sometimes result in fines. In some cases, a government sponsors the rating systems. Some countries require you to use a game rating system by the law (for example, Australia).
Where ratings appear
Most rating systems require that you show the ratings to shoppers before they complete their purchase. The game ratings and game reasons you define will appear on the Product Detail pages and in the Shopping Cart. Ratings and reasons may also appear in other places in your store if you customized your store to show them. However, this is usually not required by the rating system.
Compilation or bundle Ratings
If you want to sell one or more games together, you can provide a compilation or "bundle" ESRB game rating. There are several different rating combinations such as "Teen to Mature" or "Early Childhood to Teen" and so on. Compilation game ratings appear on the store in the Shopping Cart or Product Detail pages.
Game rating organizations
There are game and entertainment rating organizations throughout the world that provide publishers and sellers a consistent way to rate games and other entertainment products such as movies and software.
You can provide ratings using classifications from several different entities:
- BBFC (British Board of Film Classification)—Previously known as British Board of Film Censors.
- CERO (特定非営利活動法人コンピュータエンターテインメントレーティング機構)—The Japanese rating system. Also called the Computer Entertainment Rating Organization.
-
ESRB (Entertainment Software Rating Board)—The United States and Canada rating system.
Note: In addition to the standard ESRB ratings, Global Commerce provides several "combination" ESRB ratings that you can use with game bundles.
-
PEGI (Pan European Game Information)—The European rating system.
Note: The PEGI game rating entity has different rules for how you should rate games depending on where you sell them. Games sold in Portugal must use different ratings than those sold anywhere else in the world. The PEGI ratings in Global Commerce include ratings for both Portugal and the rest of the world. Use the correct rating based on where you will sell your game.
- USK (Unterhaltungssoftware Selbstkontrolle)—Also referred to as German Self-Monitoring of Entertainment Software.
- Classificação—The term used in Global Commerce to refer to the Department of Justice, Rating, Titles and Qualification (DJCTQ) Brazil rating system. In Portuguese, it is called Departamento de Justiça, Classificação, Títulos e Qualificação.
Related products
Use the Related Products option to assign related products to a specific product. When a shopper views a product in your store or a marketing offer, the related products appear.
You can use the Related Products option when there are accessories required for use with your product. This can include products such as printers and printer cartridges, laptops and laptop batteries, and computer games with expansion packs.
Using the Related Product option
The Related Products option has no specific attributes. When you use this setting with a product, add the products you want to appear as a "related product," and the system does the rest.