Use the Configure Company Settings page to configure your company's settings.
Note: When you save this page, the system immediately applies your changes (unless otherwise indicated).
General tab
| Attribute | Description |
|---|---|
| Account Information | |
| Account Manager Name | The name of the Account Manager |
| Account Manager Photo |
A photo of the Account Manager. |
| Key Revocation Reasons | |
| Revocation Reasons |
Key revocation reason determines the circumstances when you can withdraw a key for a product. A customer cannot use a revoked key to unlock or use products protected by digital rights. You can choose one or more of the Revocation Reasons: |
| Private Store Exclusive Products |
When enabled, allows you to restrict products to Private Stores only. When you enable this feature and configure products as Available for Private Store only, shoppers cannot see or purchase these products in Public Store. |
| Product Combination | |
| Product Combinations |
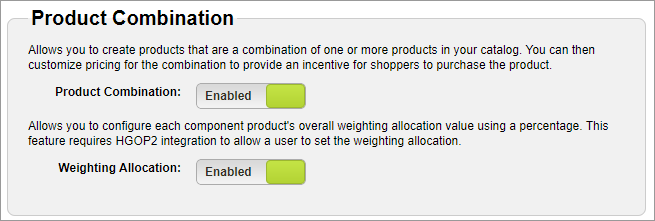
Allows you to create products that are a combination of one or more products in your catalog. You can then customize pricing for the combination to provide an incentive for shoppers to purchase the product. |
| Weighting Allocation |
Allows you to configure each component product’s overall weighting allocation value using a percentage. This feature requires HGOP2 integration to allow a user to set the weighting allocation. |
| Product End of Life Notification | |
| Notification |
When enabled, allows you to send an end-of-life notification email. |
| Email Address |
The recipient's email address for the end-of-life notification. Best Practices: Use a group email address rather than a single email address to ensure someone receives the notification. |
| Product External Reference Number | |
| Enforce Unique Value | When enabled, a user can only specify a unique product external reference number when creating a product. |
| Product Locking | |
| Locking | When enabled, allows you to lock a product when you are editing the product details to avoid interruptions from other people. |
| Restricted Product | When enabled, allows you to restrict who can see or edit specific products. |
| Source of Product Image | |
| Third party URL | When enabled, allows you to enter a URL for product images rather than uploading files to the system. Images will not appear if the outside source is unavailable. Third-party images are not scanned for viruses and should not be copyrighted. |
| Subscription Plans | When enabled, you can use subscription plans to create or manage complex subscription products for your store. |
Fulfillment tab
Order History tab
| Attribute | Description |
|---|---|
| Cross Site Sharing | When enabled, allows a consolidated view of a shopper's order history across participating sites owned by a single company. The shopper can access this information from an account associated with a participating site. |
Security tab
Subscriptions tab
| Attribute | Description |
|---|---|
| Account Updates for External Subscriptions | This feature protects your customer relationships by quickly and easily updating their payment account information. Card account information changes for many reasons, including card expirations, lost or stolen cards, and so on. This feature helps you prevent an interruption to customer service and reduce customer churn. To take advantage of this feature, contact your Digital River Account Manager. |
How to configure company settings
- Select Administration, select Company and then click Configure Company Settings. The Configure Company Settings page appears.
- Complete each tab on the Configure Company Settings page, and then click Save.
How to enable product combinations
Before you create a Product Combination (with components), you must enable product combinations.
-
Select Administration, select Company and then click Configure Company Settings. The Configure Company Settings page appears.
-
From the General tab, scroll down to the Product Combination panel and toggle the button to Enabled.

-
Click Save.
See Product Setup for more information.
How to configure when key revocations occur
The custom integrations feature allows you to create integrations that revoke a serial number or unlock code after certain events (such as a refund) happen for a product or an order. You can configure the specific events you want to trigger a revoke to occur.
- Select Administration, select Company and then click Configure Company Settings. The Configure Company Settings page appears.
- Click the General tab.
- Under Key Revocation Reasons, select the reasons when you can withdraw a key for a product. Note that the reasons you select apply to all key revocation integrations. You cannot configure the reasons per integration.
- When you are done, click Save.
How to enable account updates for external subscriptions
- Select Administration, select Company and then click Configure Company Settings. The Configure Company Settings page appears.
- Click the Subscriptions tab.
- Select Disabled. The button toggles to Enabled.
-
Click Save.