Configuring the offer's content
Use the Display Content step to enter your sales pitch, images, and other text. The POP (for the offer itself and for products in the offer) uses this information when it shows the offer in your store. If you do not select a POP, then only the "offer description in cart" display content appears in this step (all other offer types use the offer description in the cart regardless of POP).
Depending on the offer type, there may be a Product pane for each product in the offer. You need to enter the display content for each product in the offer. If you set up the offer to support multiple locales, you also have to provide display content for each locale for a product in the offer. See Localizing offers for more information.
Note that if you chose to restrict the offer to specific locales, you should enter locale-specific content for the offer in this step. If you do not provide content for the supported locales, the system uses the content for the default (base) locale.
Note: You can enter display content as straight text or HTML. You can also use other types of content if your store supports it.
Example: You can use links or paths to images and other files.
If you want to use specialized display content with your offers and POPs, contact your Store Operations team. They will work with you and the Digital River Site Design team to set up your store to support advanced display content.
For more information on the offer description in cart including how it appears on a store, see Offer Description in Cart.
If you are creating a custom bundle offer, you need to enter names for the product groups you created for the offer. See How to create custom bundle offers for more information.
Note: Site Design team often customizes the display content for each individual store. This section serves as a guide for when you have to enter display content for specific POPs and offer types. If you have questions about what display content you store uses, contact your Store Operations team.
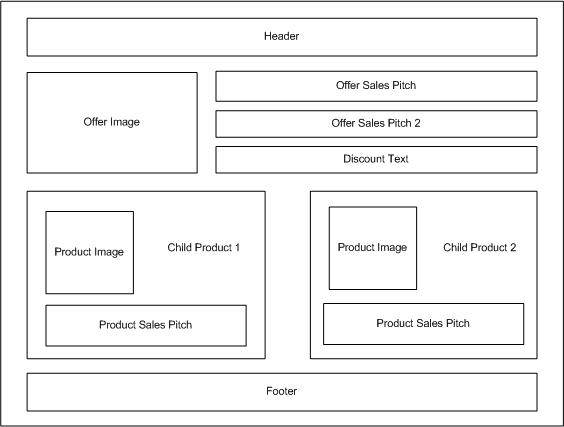
The following image shows where the display content elements appear within a POP. The display content elements create the offer image. Note that this image shows the default display content format. If you customized the display content format for your store, it will look different from the image shown here.

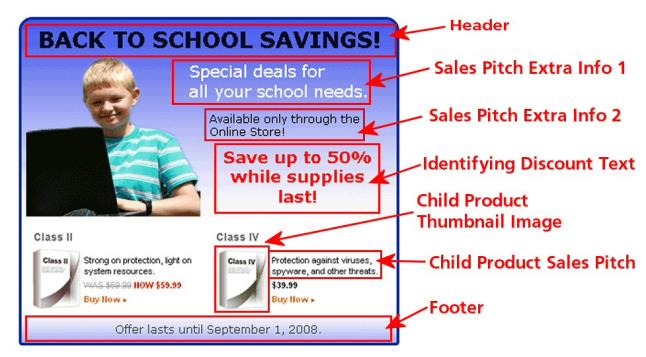
The POP used by the offer determines when an offer uses each display content element. This means you do not have to define all display content elements because the offer does not use some of the elements. The following image shows a sample POP and highlights the display content areas.

You can set up POPs in the offer to show any product attributes. By default, most POPs show the product name, image, and pricing. You can have your customize your store to show other attributes such as any Custom Family Attributes you use in your store.
Entering the localized display content
In the Create Offer wizard, you entered the localized display offer content in under Display Content for the locales you selected under Behavior. If you have individual products in the offer, you can also set the display content for the products in the offer content.
Complete the fields under each locale tab under Display Content. By default, the system copies the display content you enter for the default locale to the supported locales until you customize the content on that tab. The content you enter on under a locale tab is specific to that locale.
How the content of the offer copies across locales
When you create an offer, the system copies the display content you enter (offer images and offer text such sales pitch, header, footer, product info, and so on.) for the default to each supported locale. When you edit the display content for a supported locale, you remove copied content and that locale becomes independent from the default locale so that any changes made to the default locale’s display content does not copy down to the independently supported locale.
Offer Content
The following table describes the display content elements in an offer. The elements required by an offer depends on the POP.
Product
Display content for site-merchandising POPs
You usually customize site-merchandising POPs by client and store. For this reason, there is no standard definition for what you should enter in the various display content areas. You can test what appears in each area by creating an offer, entering content in those areas, and viewing the offer on your test store. If you need help determining which display content to use with a specific POP in your store, contact your Store Operations team.
Display Content for interstitial POPs
Content for pop-up POPs
The following table describes what you can enter for the display content when using one of the Pop-Up and Drop-In POP types. If an element does not appear here, the POP does not use that element.
| Attributes | Description |
|---|---|
| Header | The "alt" text for your pop-up image. When you enter text, do not use any single (') or double quotes ("). Your POP will not work if you use single or double quotes. |
| Footer |
Specify the width and height of the pop-up window in pixels to accommodate your offer or pop-up image. You need to specify two numbers separated by a comma. The first number is the width and the second number is the height. Best Practices: Add 11 pixels to the width and 29 pixels to the height of the image and use that as a starting size for the pop-up. You may want to tweak those values once you preview your offer. |
| Offer Image(s) | One or more images you want to appear in the pop-up. The shopper can click the image to go to the Product Details page or initiate some other action on the store (Site Design work may be required). |
Content for shopping cart POPs
You usually customize shopping cart POPs by client and store. For this reason, there is no standard definition for what you should enter for the various display content areas. You can test what appears in each area by creating an offer, entering content in those areas, and viewing the offer on your test store. If you need help determining which display content to use with a specific POP in your store, contact your Store Operations team.
Storefront Display
| Attribute | Description |
|---|---|
| Display Name |
Enter the name of the group. The shoppers will see this name when viewing the groups and products in the offer. You can use the name to help direct shoppers on what to do. Example: Choose at least one Dickens classic. Best Practices: Enter a name that will inform your shoppers about the products in the group and any restrictions you have on the number of products they can select. |
| Description | Enter a description of the group. Shoppers will not see this description. The description is only visible in Global Commerce. |