You can use or apply the following product resources to your products:
Use the Import and Export Resources feature to export a copy of your resource directory tree or import several resource files at once using a Zip file. Resource files are usually images used for products or categories, but they can also be other content you use in your store. Importing resources in a Zip file is an efficient way to import several images at once.
How to export your resource directory tree
You can use the Import and Export Resources feature to export a copy of your resource directory tree. The resource directory tree shows the directory structure of the resource files (category and product images) on your site.
The structure of your resources directory is unique to your store. Digital River set up the resource directory when they created your site. This structure shows how files and images are organized into folders and saved on your site.
- Select Catalog, select Products, and click Import and Export Resources. The Resources Import and Export page appears.
- Click Export in the Export Resource Directory Tree area. When prompted, save the file on your computer.
How to create a Zip File for Resources
You must import the resource files (product or category images) using a Zip® file. Use the resource directory tree as a reference when you build a Zip file of resource images that you want to upload. Note that you cannot import any changes to the resource directory tree.
-
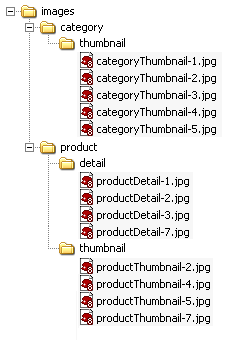
Create a folder on your computer with the name of the root folder used to store images, as shown in your resource directory tree. See How to export your resource directory tree for more information. Make sure the folder name matches the name in your resource directory tree exactly (spelling and case), or the import will not work as expected. The following example shows a sample directory structure.
Example:

-
Recreate the directory structure that appears in your exported resource directory tree. Make sure that when you create the folders, you use the correct case (as shown in your resource directory tree) and spelling for the folder names. Do not worry about putting images or files in the folders until you create the entire structure.
Example: Using the image in the first example, you would create a “category” folder and a "thumbnail" subfolder in the "images" folder. Then you would create a “product” folder that contains a “detail” subfolder and “thumbnail” subfolder.
-
Copy the images you want to import into the appropriate folder for their type.
Example: Copy the product images into the product folder used to hold product detail or thumbnail images and category images into the category folder used to hold category images.
- Create a Zip® file of the entire directory structure (including the images) that you just created. Refer to the WinZip® documentation for help on creating Zip files. Make sure you enable the Save Full Path Info option in WinZip®.
- Upload the Zip® file using the Import and Export Resources feature. See How to import resources for more information.
How to import resources
You can use the Import and Export Resources feature to import a Zip file of resource files.
- Select Catalog, select Products, and click Import and Export Resources. The Resources Import and Export page appears.
- In the Import Resource Files area, click Choose File next to the File field.
- Locate the Zip file containing the resource files you want to import and click Open.
- Click Import. A message appears when the import completes. The system notifies you when any errors occur during the import.