Webhook service
Digital River uses webhooks to notify your application (endpoint URL) when events occur. A webhook contains the event and timestamp for the event. You can use the Webhook Service page to search, create, edit, enable, disable, and delete webhooks.
When you register your webhook URLs with Digital River, Digital River creates an data object and sends webhook events that notify your application any time an event occurs.
The data object includes the type of event and the data associated with that event.
Service webhook attributes
| Attribute | Description |
|---|---|
| Webhook ID |
The webhook's unique identifier. |
| Endpoint URL |
An endpoint URL is where the payload will be sent to when the subscribed event happens. The endpoint URL must begin with either The endpoint must return a 2xx HTTP status code to acknowledge the receipt of an event. If the endpoint fails to acknowledge events over several days, the endpoint will be disabled. If Digital River receives any response codes outside this range, it indicates that you did not receive the event. For example, Digital River treats a URL redirection as a failure. |
| Secret |
A secret ensures that the received payload is the same as it is sent. When the payload is hacked, the secret will not match. You can view and rotate a webhook's secret. |
| Status |
The webhook status is Disabled by default. The system will prompt you to enable the webhook when you create a webhook. If you chose to disable the webhook, no payload would be sent when an event occurs. After you create a webhook, you can choose to enable or disable the webhook manually. Enabling a webhook manually does not require confirmation. However, you are required to provide confirmation when you manually disable a webhook by entering the username (case sensitive). |
| Last Modified On |
The date and time when the webhook was last modified. |
How to create a webhook
Before you create a webhook for the first time, you need to open your firewall to trusted Digital River IP addresses.
To create a webhook:
Required Role: Webhook Manager
-
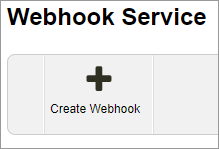
Select Administration, and then click Webhook Service. The Webhook Service page appears.

-
From the Webhook Service page, click Create Webhook.
The Create Webhook page appears.
-
Enter the URL for the endpoint in the Endpoint URL field. The endpoint URL will receive the webhook payload. The URL must start with either
https://orhttp://. -
Choose either HTTP or OAUTH as the Transport Type.
-
HTTP: To create HTTP-configured webhooks, select this option and provide the following credentials under Authentication:
-
Username: Type your username.
-
Password: Type your password.

-
-
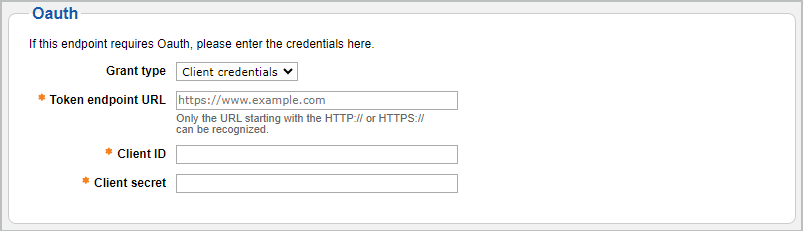
OAUTH: To create OAuth2-configured webhooks, provide the following information:
-
Grant type: Choose either Client credentials or Password.
-
Token endpoint URL: Type the URL for the token endpoint starting with the
HTTP://or HTTPS://. -
Username: Type your username. Username and Password only appear if you choose Password as the Grant type.
-
Password: Type your password.
-
Client ID: Provide the API key for your account.
-
Client secret: Provide the confidential key for your account.
-
-
-
Optional. Select Enabled for Status.
Note: If you do not select Enabled, no payment will be sent when an event occurs. Also, the system will ask you if you want to enable the webhook when you click Create.
-
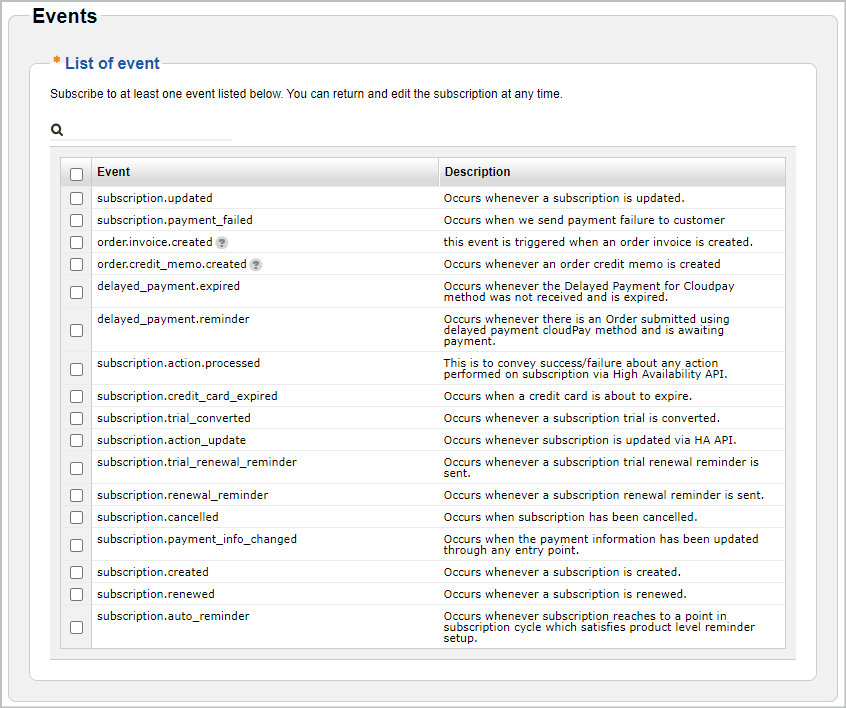
Select the checkbox next to each event you want to associate with the endpoint, or select the checkbox next to Event to select all events. You must select at least one event type.
-
Scroll down and click Create. By following these steps, you will successfully subscribe to selected event types, enabling your systems to receive notifications and respond to changes promptly.
How to search for a webhook
To search for an existing webhook:
Required Role: Webhook Manager
-
Select Administration, and then click Webhook Service. The Webhook Service page appears.
- Type the webhook's entire ID in the Webhook ID field on the Webhook Service page and click Search. The webhook will appear in the list.
-
Click the link under the Endpoint URL column to view the webhook details.
How to edit a webhook
To edit a webhook:
Required Role: Webhook Manager
-
Select Administration, and then click Webhook Service. The
Webhook Service page appears.
-
Select the Webhook ID you want to disable or enable from the list and click Edit. The Edit Webhook page appears.

-
Enter the URL for the endpoint in the Endpoint URL field.
-
Optional. Enter the user credentials for the endpoint in the Username and Password fields.
Note: If you do not need an extra layer of security, you can leave these fields blank. -
Toggle Status from Disabled or Enabled.
-
Select the checkbox next to each event you want to associate with the endpoint or select the checkbox next to Event to select all events. At least one event type must be selected.
-
Scroll down and click Save.
How to enable or disable a webhook
To enable or disable a webhook:
Required Role: Webhook Manager
-
Select Administration, and then click Webhook Service. The Webhook Service page appears.
-
Select the Webhook ID you want to disable or enable from the list and click Enable/Disable.
-
From the Webhook Status Change dialog, enter your username in the field and click Proceed. Note that the Username field is case-sensitive. The Secret column displays the endpoint's secret.

How to reveal a webhook's secret
To reveal a webhook's secret, you need to retrieve your endpoint's secret from the Webhook Service settings:
Required Role: Webhook Manager
-
Select Administration, and then click Webhook Service. The Webhook Service page appears.
-
Find the webhook with the secret you want to verify and click the Reveal Secret link. The Reveal Secret dialog appears.

- Provide your username in the field and click Reveal. The Reveal Secret field under Secret will display the token. Note that the Username field is case-sensitive. The Secret column displays the endpoint's secret.
How to rotate a webhook's secret
You can rotate a webhook's secret on the Webhook Service page in Global Commerce if you think a webhook's secret is compromised. When you rotate the secret, Global Commerce blocks the old secret and generates a new one. You can choose to block the old secret immediately or allow it to expire after the specified expiration time when you rotate the secret. During that specified expiration time, both secrets work. It gives you time to make the transition from the old secret to the new secret. In either case, you can use the new secret immediately.
You can maintain up to five secrets per webhook.
Required Role: Webhook Manager
-
Select Administration, and then click Webhook Service. The Webhook Service page appears.
-
Find the webhook with the secret you want to rotate and click the Rotate Secret link. The Reveal Secret dialog appears.

-
Choose an expiration option from the Expiration Time list. Your options are Immediately, 1 Hour, 3 Hours, 6 Hours, 12 Hours, or 24 Hours.
-
Provide your Global Commerce username and click Rotate. Note that the Username field is case-sensitive. Click Reveal Secret if you want to see the new secret token.
How to delete a webhook
To delete a webhook:
Required Role: Webhook Manager
-
Select Administration, and then click Webhook Service. The
Webhook Service page appears.
-
Select the Webhook ID you want to delete from the list and click Delete. The Delete Webhook dialog appears.

-
Click Yes to delete the webhook. Note that once you delete a webhook, you cannot recover it.